Android设备屏幕不一,为了更好的用户体验,我们必须做适配不同屏幕的操作
Dependencies and prerequisites
You should also readSupporting Multiple Screens
Download the sample appNewsReader.zip
Supporting Different Screen Sizes
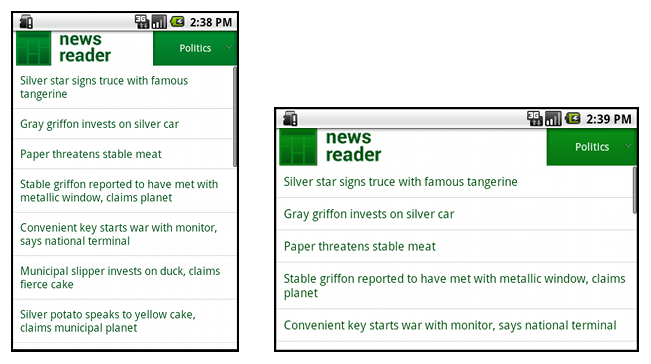
Use “wrap_content” and “match_parent”[使用wrap_content与match_parent]
wrap_content:宽高根据内容大小调整
match_parent:伸展至与父控件一致
1
2
3
4
5
6
7
8
9
10
11
12
13
14
15
16
17
18
19
20
21
22
23
24
25
26
27
28
29
30
31
32
<LinearLayout xmlns:android= "http://schemas.android.com/apk/res/android"
android:orientation= "vertical"
android:layout_width= "match_parent"
android:layout_height= "match_parent" >
<LinearLayout android:layout_width= "match_parent"
android:id= "@+id/linearLayout1"
android:gravity= "center"
android:layout_height= "50dp" >
<ImageView android:id= "@+id/imageView1"
android:layout_height= "wrap_content"
android:layout_width= "wrap_content"
android:src= "@drawable/logo"
android:paddingRight= "30dp"
android:layout_gravity= "left"
android:layout_weight= "0" />
<View android:layout_height= "wrap_content"
android:id= "@+id/view1"
android:layout_width= "wrap_content"
android:layout_weight= "1" />
<Button android:id= "@+id/categorybutton"
android:background= "@drawable/button_bg"
android:layout_height= "match_parent"
android:layout_weight= "0"
android:layout_width= "120dp"
style= "@style/CategoryButtonStyle" />
</LinearLayout>
<fragment android:id= "@+id/headlines"
android:layout_height= "fill_parent"
android:name= "com.example.android.newsreader.HeadlinesFragment"
android:layout_width= "match_parent" />
</LinearLayout>
下面是相应的layout出现的屏幕
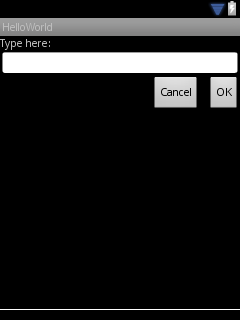
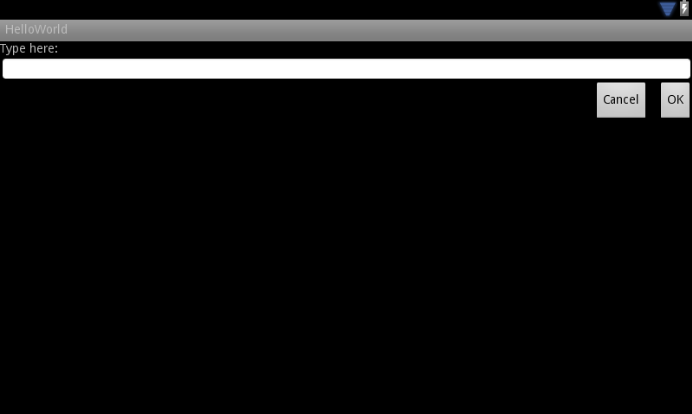
Use RelativeLayout[使用相对布局]
如果我们需要一个相对的位置而不是仅仅是直线型的布局,那么我们可以使用RelativeLayout
1
2
3
4
5
6
7
8
9
10
11
12
13
14
15
16
17
18
19
20
21
22
23
24
25
26
27
28
29
<?xml version="1.0" encoding="utf-8"?>
<RelativeLayout xmlns:android= "http://schemas.android.com/apk/res/android"
android:layout_width= "match_parent"
android:layout_height= "match_parent" >
<TextView
android:id= "@+id/label"
android:layout_width= "match_parent"
android:layout_height= "wrap_content"
android:text= "Type here:" />
<EditText
android:id= "@+id/entry"
android:layout_width= "match_parent"
android:layout_height= "wrap_content"
android:layout_below= "@id/label" />
<Button
android:id= "@+id/ok"
android:layout_width= "wrap_content"
android:layout_height= "wrap_content"
android:layout_below= "@id/entry"
android:layout_alignParentRight= "true"
android:layout_marginLeft= "10dp"
android:text= "OK" />
<Button
android:layout_width= "wrap_content"
android:layout_height= "wrap_content"
android:layout_toLeftOf= "@id/ok"
android:layout_alignTop= "@id/ok"
android:text= "Cancel" />
</RelativeLayout>
上面图片是:Screenshot on a QVGA screen (small screen).
上面图片是:Screenshot on a WSVGA screen (large screen).
Use Size Qualifiers[使用大小标识符]
虽然我们可以用上面的方法定义布局文件,让其在不同的情况下进行拉伸等动作,可是在某些比较大的屏幕,比如平板与TV上面还是不太适合,我们最好可以在这种情况下使用两套不同的布局文件来适配大小,我们可以使用大小标示符来标记不同的布局,让机器在运行程序的时候根据自身的大小来选择显示哪个布局
通常在 Tablets and TVs的AP上使用”two pane”的布局,这样
res/layout/main.xml, single-pane (default) layout:
1
2
3
4
5
6
7
8
9
10
<LinearLayout xmlns:android= "http://schemas.android.com/apk/res/android"
android:orientation= "vertical"
android:layout_width= "match_parent"
android:layout_height= "match_parent" >
<fragment android:id= "@+id/headlines"
android:layout_height= "fill_parent"
android:name= "com.example.android.newsreader.HeadlinesFragment"
android:layout_width= "match_parent" />
</LinearLayout>
res/layout-xlarge/main.xml, two-pane layout:
1
2
3
4
5
6
7
8
9
10
11
12
13
14
<LinearLayout xmlns:android= "http://schemas.android.com/apk/res/android"
android:layout_width= "fill_parent"
android:layout_height= "fill_parent"
android:orientation= "horizontal" >
<fragment android:id= "@+id/headlines"
android:layout_height= "fill_parent"
android:name= "com.example.android.newsreader.HeadlinesFragment"
android:layout_width= "400dp"
android:layout_marginRight= "10dp" />
<fragment android:id= "@+id/article"
android:layout_height= "fill_parent"
android:name= "com.example.android.newsreader.ArticleFragment"
android:layout_width= "fill_parent" />
</LinearLayout>
“xlarge”可以用来标示哪些屏幕比较大的情况,在那些设备上,系统会自动选择two-pane的布局,对于其他小点的设备就会自动选择default的布局
Use the Smallest-width Qualifier[使用最小宽度标识符]
在很多时候我们不方便判断具体多大的屏幕才叫做large(比如5“与7”的设备),所以在Android 3.2之后引入了sw600dp,这样的方式来表示那些屏幕宽度至少是600dp以上的设备(通常7“的设备都至少会有600dp的宽)
我们这可以这样定义一个布局文件:res/layout-sw600dp/main.xml(这是一个two-pane的布局),这样设置之后,系统会在设备屏幕宽至少600dp的时候自动选择显示这个布局文件,当然小于的情况下就会选择默认的res/layout/main.xml布局文件。
However,我们不能在Android 3.2之前的设备上使用这样的表示方法,仍然需要使用xlarge来处理这样的大屏幕情况
Use Layout Aliases [使用布局文件别名]
1
2
3
<resources>
<item name= "main" type= "layout" > @layout/main_twopanes</item>
</resources>
res/values-sw600dp/layout.xml:
1
2
3
<resources>
<item name= "main" type= "layout" > @layout/main_twopanes</item>
</resources>
这样一来,就只需写一份two-pane的布局文件,两个布局设置都引用它.(这个设计很容易理解,通常很多地方我们都有这样做过)
Use Orientation Qualifiers [使用方向标识符]
一些布局可以很好的自动适配横屏landscape与竖屏portrait,但是我们最好是针对不同的方向设置不同的布局会比较好。比如我们现在有这样一个需求:
small screen, portrait: single pane, with logo
small screen, landscape: single pane, with logo
7” tablet, portrait: single pane, with action bar
7” tablet, landscape: dual pane, wide, with action bar
10” tablet, portrait: dual pane, narrow, with action bar
10” tablet, landscape: dual pane, wide, with action bar
我们可以使用上面说的别名方法,对上面的需求抽取出一些公共的布局元素,定义下面几个布局:
1
2
3
4
5
6
7
8
9
10
<LinearLayout xmlns:android= "http://schemas.android.com/apk/res/android"
android:orientation= "vertical"
android:layout_width= "match_parent"
android:layout_height= "match_parent" >
<fragment android:id= "@+id/headlines"
android:layout_height= "fill_parent"
android:name= "com.example.android.newsreader.HeadlinesFragment"
android:layout_width= "match_parent" />
</LinearLayout>
res/layout/onepane_with_bar.xml:
1
2
3
4
5
6
7
8
9
10
11
12
13
14
15
16
17
18
19
20
21
22
23
24
25
26
27
28
29
30
31
32
<LinearLayout xmlns:android= "http://schemas.android.com/apk/res/android"
android:orientation= "vertical"
android:layout_width= "match_parent"
android:layout_height= "match_parent" >
<LinearLayout android:layout_width= "match_parent"
android:id= "@+id/linearLayout1"
android:gravity= "center"
android:layout_height= "50dp" >
<ImageView android:id= "@+id/imageView1"
android:layout_height= "wrap_content"
android:layout_width= "wrap_content"
android:src= "@drawable/logo"
android:paddingRight= "30dp"
android:layout_gravity= "left"
android:layout_weight= "0" />
<View android:layout_height= "wrap_content"
android:id= "@+id/view1"
android:layout_width= "wrap_content"
android:layout_weight= "1" />
<Button android:id= "@+id/categorybutton"
android:background= "@drawable/button_bg"
android:layout_height= "match_parent"
android:layout_weight= "0"
android:layout_width= "120dp"
style= "@style/CategoryButtonStyle" />
</LinearLayout>
<fragment android:id= "@+id/headlines"
android:layout_height= "fill_parent"
android:name= "com.example.android.newsreader.HeadlinesFragment"
android:layout_width= "match_parent" />
</LinearLayout>
1
2
3
4
5
6
7
8
9
10
11
12
13
14
<LinearLayout xmlns:android= "http://schemas.android.com/apk/res/android"
android:layout_width= "fill_parent"
android:layout_height= "fill_parent"
android:orientation= "horizontal" >
<fragment android:id= "@+id/headlines"
android:layout_height= "fill_parent"
android:name= "com.example.android.newsreader.HeadlinesFragment"
android:layout_width= "400dp"
android:layout_marginRight= "10dp" />
<fragment android:id= "@+id/article"
android:layout_height= "fill_parent"
android:name= "com.example.android.newsreader.ArticleFragment"
android:layout_width= "fill_parent" />
</LinearLayout>
res/layout/twopanes_narrow.xml:
1
2
3
4
5
6
7
8
9
10
11
12
13
14
<LinearLayout xmlns:android= "http://schemas.android.com/apk/res/android"
android:layout_width= "fill_parent"
android:layout_height= "fill_parent"
android:orientation= "horizontal" >
<fragment android:id= "@+id/headlines"
android:layout_height= "fill_parent"
android:name= "com.example.android.newsreader.HeadlinesFragment"
android:layout_width= "200dp"
android:layout_marginRight= "10dp" />
<fragment android:id= "@+id/article"
android:layout_height= "fill_parent"
android:name= "com.example.android.newsreader.ArticleFragment"
android:layout_width= "fill_parent" />
</LinearLayout>
这样以来,我们需要在setContentView的时候选择main_layout就可以了,系统会选择到相应的Value里面取出对应的布局文件进行显示
1
2
3
4
<resources>
<item name= "main_layout" type= "layout" > @layout/onepane_with_bar</item>
<bool name= "has_two_panes" > false</bool>
</resources>
res/values-sw600dp-land/layouts.xml:
1
2
3
4
<resources>
<item name= "main_layout" type= "layout" > @layout/twopanes</item>
<bool name= "has_two_panes" > true</bool>
</resources>
res/values-sw600dp-port/layouts.xml:
1
2
3
4
<resources>
<item name= "main_layout" type= "layout" > @layout/onepane</item>
<bool name= "has_two_panes" > false</bool>
</resources>
res/values-xlarge-land/layouts.xml:
1
2
3
4
<resources>
<item name= "main_layout" type= "layout" > @layout/twopanes</item>
<bool name= "has_two_panes" > true</bool>
</resources>
res/values-xlarge-port/layouts.xml:
1
2
3
4
<resources>
<item name= "main_layout" type= "layout" > @layout/twopanes_narrow</item>
<bool name= "has_two_panes" > true</bool>
</resources>
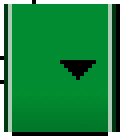
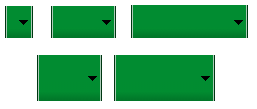
Use Nine-patch Bitmaps[使用9-patch图片]
nine-patch bitmaps:which are specially formatted PNG files that indicate which areas can and cannot be stretched. (一种有限制的可伸缩的图片格式,为了避免通常的图片在伸缩后出现的不某些不适配,比如图片中有个logo,你不希望这个logo随拉伸而拉伸,那么我们就应该使用这种格式的图片来定义哪些区域可以拉伸)。我们可以使用draw9patch这个工具(位于tools/目录下)来把普通图片转换为9-patch格式的图片。
这个图片一个扩大的缩略图,图中可以看到有三个黑点,分别指示了哪些位置可以被拉伸,仔细看了还怎么个拉伸的原理,暂时没有看出来,还请大家赐教,不过好的是,我们可以用draw9patch查看缩放的效果图。
.9图片的设置效果(android:background=”@drawable/button”)
可以看到这样的图片不会对那个下拉图标进行拉伸,这样就达到了我们需要的效果,不然下拉图标也被拉伸会显得很不合适。
学习自:http://developer.android.com/training/multiscreen/index.html ,请多指教,谢谢! 转载请注明出自http://kesenhoo.github.com ,谢谢配合!