胡凯

Android Training - 使用Fragments建立动态的UI(Lesson 3 - 创建灵活可变的UI)

| Comments

Building a Flexible UI

当把你的程序设计成可以适配一系列大小各异的屏幕时,你可以基于可使用的屏幕空间来为你的fragments设置不同的参数,从而达到重用的目的。
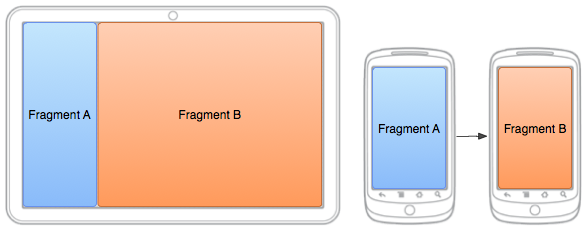
例如:在手持设备上,一次显示一个fragment会比较合适。对应的,在平板这样屏幕比较大的设备上,你可以用多个fragment的方式来呈现出side-by-side的效果。这样能够一次显示更多的信息给用户。如下图所示:

fragments-screen-mock.png

FragmentManager类提供了运行时进行添加,移除,替换fragment的方法,这样就创建了一个动态的体验。

Add a Fragment to an Activity at Runtime[运行时添加fragment]

  • 与在XML文件中定义个fragment不同,你可以在运行时添加fragment到activity中。如果你打算在activity的某个生命周期中改变fragment,这个方法则是很有必要的。
  • 为了执行添加或者移除fragment的切换,你必须使用 FragmentManager 来创建一个FragmentTransaction, 它会提供添加,移除,置换与其他的一些动作的APIs。
  • 如果你的activity允许fragment被移除与置换,你必须在activity的onCreate()方法里面添加初始化的fragmentt(s)。
  • 当处理那些fragment的时候,特别是运行时做添加动作时,有一个重要的规定:fragment必须有一个容器View 来装它。(例如使用LinearLayout等container来包装那个fragment)
  • 下面的layout示例是上一节课的内容。示例使用了一个空的FrameLayout来扮演那个fragment的container。(方便后面添加fragment进去)
    res/layout/news_articles.xml
1
2
3
4
<FrameLayout xmlns:android="http://schemas.android.com/apk/res/android"
    android:id="@+id/fragment_container"
    android:layout_width="match_parent"
    android:layout_height="match_parent" />

在你的activity中,执行 getSupportFragmentManager() 来获得一个 FragmentManager。然后执行 beginTransaction() 来创建 FragmentTransaction ,最后执行 add() 来添加一个fragment。

你可以使用同一个 FragmentTransaction.来预设多个fragment的切换。当你准备想要执行那些设置时,你必须执行 commit()。

例如,下面是一个如何添加一个fragment的例子:

1
2
3
4
5
6
7
8
9
10
11
12
13
14
15
16
17
18
19
20
21
22
23
24
25
26
27
28
29
30
31
32
33
import android.os.Bundle;
import android.support.v4.app.FragmentActivity;

public class MainActivity extends FragmentActivity {
    @Override
    public void onCreate(Bundle savedInstanceState) {
        super.onCreate(savedInstanceState);
        setContentView(R.layout.news_articles);

        // Check that the activity is using the layout version with
        // the fragment_container FrameLayout
        if (findViewById(R.id.fragment_container) != null) {

            // However, if we're being restored from a previous state,
            // then we don't need to do anything and should return or else
            // we could end up with overlapping fragments.
            if (savedInstanceState != null) {
                return;
            }

            // Create an instance of ExampleFragment
            HeadlinesFragment firstFragment = new HeadlinesFragment();

            // In case this activity was started with special instructions from an Intent,
            // pass the Intent's extras to the fragment as arguments
            firstFragment.setArguments(getIntent().getExtras());

            // Add the fragment to the 'fragment_container' FrameLayout
            getSupportFragmentManager().beginTransaction()
                    .add(R.id.fragment_container, firstFragment).commit();
        }
    }
}

因为这个fragment是在运行时被添加到 FrameLayout container ,而不是上一节课的定义XML的方式。所以activity可以做移除与置换fragment的动作。

Replace One Fragment with Another [置换fragment]

置换fragment的流程与添加fragment是类似的,仅仅需要使用replace() 来替代 add()

当你执行fragment的置换或者移除等切换动作时请注意:因为用户很可能想做后退与撤销的动作,为了让用户能够回退到之前的状态,你必须在你commit FragmentTransaction 之前执行 addToBackStack()。

Note: 当你执行移除或者置换操作并且把这个动作添加到back stack的时候,被移除的fragment并没有被销毁而是stopped状态。如果用户执行回退的操作来恢复那个fragment,它会被restart。如果你没有把那个动作添加到back stack,那么fragment会被销毁。

下面是fragment的置换示例:

1
2
3
4
5
6
7
8
9
10
11
12
13
14
15
// Create fragment and give it an argument specifying the article it should show
ArticleFragment newFragment = new ArticleFragment();
Bundle args = new Bundle();
args.putInt(ArticleFragment.ARG_POSITION, position);
newFragment.setArguments(args);

FragmentTransaction transaction = getSupportFragmentManager().beginTransaction();

// Replace whatever is in the fragment_container view with this fragment,
// and add the transaction to the back stack so the user can navigate back
transaction.replace(R.id.fragment_container, newFragment);
transaction.addToBackStack(null);

// Commit the transaction
transaction.commit();

这个addToBackStack() 的方法会需要一个可选的string参数来指定这个特定的动作。除非你需要使用FragmentManager.BackStackEntry的API来做一些更加高级复杂的操作,一般是不需要传递的。


学习自:https://developer.android.com/training/basics/fragments/fragment-ui.html,请多指教,谢谢!
转载请注明出自http://kesenhoo.github.com,谢谢配合!

Comments